Showing posts with label Puppets. Show all posts

Thursday, February 20, 2014

Puppet Building Workshop

     A big thank you to all who spread the word and attended the 
       puppet-building workshop I taught at TAIS on the weekend - 
     great times and puppet-nerding were had by all.

Monday, January 13, 2014

TAIS puppet-building workshop

Hey, friends! I am going to be leading a puppet-building workshop at the Toronto Animated Image Society on February 16th, 11am-5pm. Interested, or know anyone who might be? A little more info on it can be found here-a, alongside some other fantastic upcoming workshops.

Tuesday, August 13, 2013

Most Loyal music video puppet

 The initial character design

  Choosing fabrics for the clothing. I used old felt for the mittens, blue pleather for the boots, red cotton (tinted with a bit of turmeric for an orange-ish tint) for the pants, and some sort of vintage fabric with the perfect scale of weave for the coat. It was originally a pinky-purple, which I then bleached, dyed fuchsia, bleached again slightly, and tinted with turmeric to create the pale peachy-pink colour seen here. Her hat (not seen here) was hand-crocheted under the tutelage of my roommate the pro, and also dyed with turmeric and a bit of beet juice.

 Sculpting the head (plumber's epoxy, foil, super-sculpey), pre-baking stage

 Baked and painted!

 Foam-upholstered body, trimmed to shape

 Tailoring some winter clothes...

And the finished puppet, minus her toque

Tuesday, April 17, 2012

Myrtle


Well, spring has sprung and I'm starting a new puppet.

Tuesday, February 21, 2012

New & ImproO0oved


I gave him a new body and shoes. The original was alright in terms of a first try, but I knew I could do better.


Lengthened his bowtie and shirt sleeves, smaller stitching on his pant seams, and better stitching overall on his vest, the pockets in particular. Quite pleased with this version.


(This shot actually creeps me out a little).

Tuesday, January 3, 2012

Jackets & Coats, Jackets & Coats

First post of a new year, and with that, first things first: Happy New Year!


I did a bit of sewing over the holidays; mostly alterations/re-purposing on 'big-people clothes' as I tend to to call them, in comparison to the usual miniature size. Happily, I worked on some of the latter as well and learned some valuable things along the way. Namely - the fabric used (a sort of corduroy) is actually a little too thick to be working with on this scale. It's deceptive because on first touch it's not an overly stiff or heavy fabric (or so I thought), but it really bulks up at seams and pairing it with a thinner silky material for the collar caused some trouble. Additionally, attaching the collar first before the side-seams (coupled with an under-stitched lining at the bottom of the jacket) really limited the ability to do any adjusting afterwards. Corduroy - this version, at any rate - also attracts alot of dust. Not so good when you're animating.

But you finish what you started and ponder all these things up for next time.


A little coat-tail.


I've also started on his over-coat, with the intention of it having the look of some sort of thick-textured, winter-defying heavy ..thing. I'm exploring different looks and am undecided between adapting a literal representation of the conceptual sketches I've done (the needle-thread one on the right), or something a little softer and more experimental, a la needle-felted (on the left). Thoughts?

Monday, November 14, 2011

Uncle Antlers - Costuming, Part II!


Pants, shirt, vest, polka-dot bow-tie.. (he's been expecting a jacket, currently in production).

I like the progression his wardrobe's been making. He may be technically dead but he's not unpleasant - his clothes are of a proper sort, and the bow-tie (polka-dots and warm pastels) makes him a little more endearing.


I opted for painting a layer of brown acrylic over the tissue-paper-covered antlers, and used ink and a toothpick to add lines and grooves.

The Bowtie:

French knots on silk (remnants of a childhood hair-scrunchie).


I added interfacing to add more durability - the fabric by itself isn't terribly strong, and this prevents it from excessive splitting between the fabric fibres when I'm poking the needle through.


Trimmed to size and ironed.


Top and sides sewn; from there I tucked under and hand-stitched the bottom closed, then scrunched the square down into a bow-tie volume and sewed the middle to maintain that shape. I was originally going to use some of the silk to form the middle band, but it would have been too bulky and I've since warmed up to the thread alternative - it adds a bit of a folksy, hand-made feel.

Wednesday, November 2, 2011

Uncle Antlers - Costuming!


So! Costuming. Currently I'm a little under half-way through fabricating a costume for Uncle Antlers. (Vest needs finishing and tailoring, he's due to receive a velvet jacket, and an overcoat yet). I initially wasn't sure what kind of colour scheme to dress him in - any exploratory artwork has been pen sketches in black and white, and I wanted to make sure he fits into a distinct world that carries its own colour combinations and sense of atmosphere. Then I found this wonderful fabric at Value Village that is a brownish, almost-mauve-(rhymes-with-stove) colour but contains a tint of teal that shows up when the light hits it right. It's fantastic. From there I opted to go with a complementary navy for the rest of his suit, and I like the mix of a light-warm/dark-cool colour combo, along with the different textures involved.


I'm going for a formal and classic suit-style (almost tux-status, what with his shirt darts and a coming-soon bow tie) with references from early 1900's mens' wear. I ran an outer seam down the front of his pants to stress the crease and maintain its crispness; tailored structure. Also, I'm very proud to have made a lined vest in this scale.


Airbrushed base colour.


Added grit: acrylic paint, eye-shadow powders, and dirt.


Antlers and vest buttons...

Wednesday, October 26, 2011


Pictured, above: A (slightly) bulked-up Uncle Antlers, and my dad's model trucks (a love for miniature runs in the blood). As for feet, I've gone the magnetic route for securing him to sets so as to keep my options open at this point, and they're detachable (brass-stock on the bottom of his legs and top of his feet) so that there's a possibility for different rigging alternatives when it comes to actual animating.

Next week - some posts on costuming!

Friday, October 21, 2011

Uncle Antlers (a progress)


I've been meaning to make this fellow for a while. Starting with a rough scale drawings of his desired proportions, I've assembled a nice little epoxy-and-wire skeletal base which will then be bulked up with upholstery foam.


And his antlers - I'm still exploring the best means of producing these. I initially figured they'd be sculpted in clay, but when I gave that a shot I found it looked too chunky and 'heavy' to maintain any sense of gracefulnss. So I stiffened them a bit with gap-filling glue and plumber's epoxy, then added a layer of black tissue paper on top for a bit of contrasting texture to the smoothness of his head. The black's a bit too dark though, so I'm considering either adding a lighter layer of tissue paper on top, or painting details and a more accurate colur over the black. Suggestions?

Wednesday, October 19, 2011

Tuesday, September 27, 2011

a new puppet!


A puppet commission I finished fabricating recently, to be used in an online training tutorial.


(Substance: Armature wire, plumber's epoxy, sculpey, upholstery foam, liquid latex, houndstooth neckerchief).

Monday, December 27, 2010

haHA! Finis!


Quite happy to say I finished this little guy. This is not to imply he was a pain to work on (it was a decent challenge and one that was enjoyed), but I think I dragged it on longer than I should have and I like finishing things off within a reasonable amount of time before jumping on to something else.

I'm pretty happy with how he turned out; being more of a learning-curve project, I started with a loose image in mind and wasn't entirely sure how the final product was going to shape up. If I made a second version, I'd opt for a larger size (looking back, I don't know why I made him so small - he's not tiny, but still pushes the small end of the spectrum for practicality vs. design functions. (Ex: Feet magnet size - had I made his body somewhat larger, it would have emphasized the what-I-hoped-to-be 'tiny feet' look a bit more, his legs could have been made a little thicker without looking bulky in comparison, sewing the fur on might have been easier, and so on). Also, I would have focussed on a more replacement-friendly design: as it stands, this one isn't so much. Overall though he works for my purposes, and I think he turned out rather cute.


Getting a nice even skin tone with my new airbrush.


Adding the deets.


Cutting out the fur: made a paper pattern, used an old fur coat sleeve I got from my great-aunt who had unfulfilled aspirations of turning it into some sort of hand muff. For all I know, it could very well be actual opossum fur. I got in some experience working with fun-fur during a short little stint at Banjo Puppets, and that helped with knowing how to work with the fur here (small snips close to the leather so you don't end up giving it a haircut at the same time, and de-fluffing after cutting).


I was originally going to give him fur all around; fur under-belly, fur legs. Found out (as I kinda suspected) it gets way too thick for the size I'm dealing with. Felt turned out to be a nice alternative. Felt, if it's used out of a proper context or setting tends to look cheap and tacky, but I think it works fine here since it has a rough texture that offsets the fur nicely. (Comparatively smoother, but not T00 smooth).


Made a small stitch down the back to keep the fur in place, which helped when stitching down the sides as well.


And reference!

Sunday, November 28, 2010

Progression


More progress on the puppet. I've been relegating this fellow to the back burner for a while, but hopefully no more. It's been a bit hectic lately: the first two or so weeks of November I was helping out two puppet-makers in Toronto, brushing up on my sewing skills, introducing myself to industrial rotary cutters and machines, learning the art of cutting Fun Fur (which indeed lives up to the name), inserting plastic eyeballs and consuming a whole lot of tea. Good times.

Prior to that I attended the Montreal Stop-motion Film Festival. I enjoyed meeting other stop-mo aficionados - including Oscar-nominated stop-motion animator and director Barry Purves!, viewing recent outpourings of stop-motion films made within the last year or two, and taking in the local culture of Montreal. The weekend following I attended a screening of my film at the Rendezvous with Madness film festival put on by Dufferin Arts here in Toronto. I participated in an after-screening discussion panel with Canadian film-maker Maureen Judge (The Scarf screened with her documentary feature The August Years of May & Gloria, very sweet film dealing with a mother-daughter care-giving relationship during the onset of Alzheimer's), a community support worker, a clinician of Baycrest, a caregiver, and a very kind moderater. This was the first time I'd done any sort of panel participation, and I really appreciate the discussion Rendezvous brings to the table - watching something you've made with a crowd that has a personal interest in the subject matter and addressing the core of what the films are about, was an incredibly valuable experience. An altogether wholesome and solid fest.

I google-searched my film some time ago and discovered it played at
ASIFA-Atlanta's 'Roll Yer Own' screening, which I'd submitted to in April. I never heard from them and assumed it hadn't been picked up, but as it turns out my film not only made it in but also won best-in-show! From there it played in Australia for International Animation Day - which is October 28th and also happens to be my birthday; a very good day indeed. The Scarf is also travelling with the Atlantic Film fest's International Viewfinders Festival, an outreach program that visits schools in rural communities of Atlantic Canada to show films and involve the students in filmmaking workshops. Very neat idea. My film will also be featured in Singapore's very first International Children's Film Festival (more details when they come)!

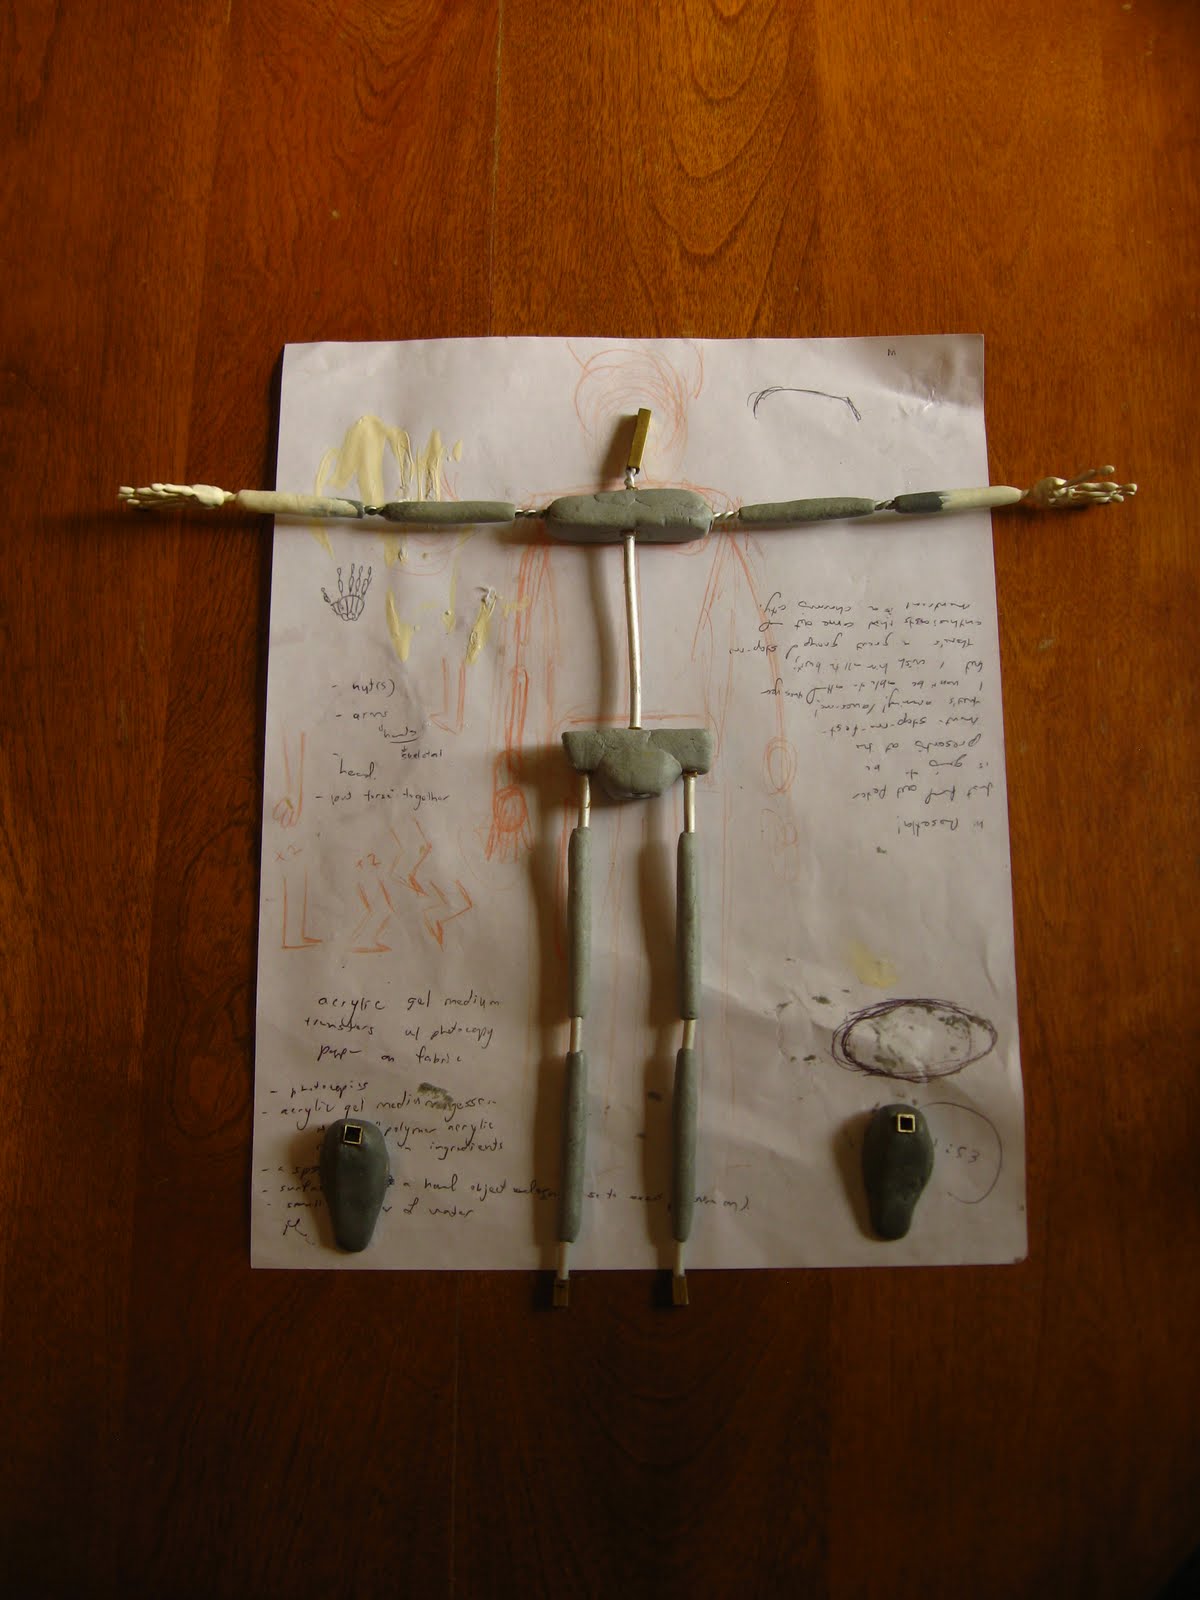
Anyways, back to this guy:


Magnets: I went back to magnets in the feet for this one, though these are slightly smaller (not as strong, but I think with four feet he should be alright).


One good thing about living out here - Niagara for the time - is that my family has a bit of a pack-rat streak in it (are these things genetic? Nature versus Nurture?) and chances are if you hunt hard enough for anything, you're bound to find it. Story of the Fishing-line.


p.s. The ears are comprised of black-wrap foil sandwiched between a layer of fabric and ribbon, so they're theoretically animateable.