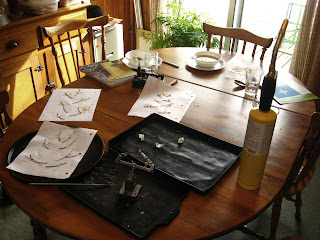
Sunday, December 22, 2013


O come, Desire of the nations, bind
in one the hearts of all mankind;
bid every strife and quarrel cease
and fill the world with heaven's peace.

Friday, November 8, 2013

R-DubbleYeah-F


I haven't been to the Royal Winter Fair since school, 'twas a nice little treat to venture forth with the roomies and bust out the watercolours, sample cheeses, draw livestock, observe folks. 

Wednesday, October 16, 2013

Monday, September 16, 2013

I was in a conversation last weekend in which the conversant (an artist) lamented 'it's too bad [one] can't make a living doing art.' I find these shruggy blanket statements a bit maddening and would like to say right here that there are people who have done it and continue to do so, myself included.

It's hard work, to be sure, and I'm not saying this lightly. It's not for everyone, nor perhaps for all phases of life. Sometimes it's scary, sometimes it's discouraging, and uncertainty is in its nature. But if you need to create and you've got the skills, go do it. If you don't have the skills, develop them or seek out someone who has them. Find ways. Know what you want to do as well as what you don't want to do so you can sidestep things that would lead you down other paths. Listen, ask questions, make your own decisions. Surround yourself with people who are supportive. 

And I can't stress enough how important persistence is.
    

Tuesday, August 13, 2013

Most Loyal music video puppet

 The initial character design

  Choosing fabrics for the clothing. I used old felt for the mittens, blue pleather for the boots, red cotton (tinted with a bit of turmeric for an orange-ish tint) for the pants, and some sort of vintage fabric with the perfect scale of weave for the coat. It was originally a pinky-purple, which I then bleached, dyed fuchsia, bleached again slightly, and tinted with turmeric to create the pale peachy-pink colour seen here. Her hat (not seen here) was hand-crocheted under the tutelage of my roommate the pro, and also dyed with turmeric and a bit of beet juice.

 Sculpting the head (plumber's epoxy, foil, super-sculpey), pre-baking stage

 Baked and painted!

 Foam-upholstered body, trimmed to shape

 Tailoring some winter clothes...

And the finished puppet, minus her toque

Monday, July 29, 2013

kaleidoscope

One of the first few times I listened to the song Dog Walker by The Most Loyal, I pictured a rotating kaleidoscope for the chorus that would resemble a church's stained glass window.


I drew a rough representation of what that might look like in the context of the leica reel, and set about figuring what this might look like in bringing it to actuality. First steps included researching how to make one of those contraptions, what to use for the little fragments (went with shrinky-dinks, which are amazing, for the record), and most importantly, how to rig that in such a way that it rotated evenly and smoothly. 

plans

shrinky-dinks, pre-shrunk


 The first kaleidoscope version I animated was a toilet-paper tube rotating in a square cardboard frame that was glued to my light disc's surface. (Handy, these light desks). I had originally intended to glue just the toilet paper kaleidoscope to the disc and rotate that, but had difficulties with that since the disc didn't rotate evenly in the desk so the kaleidoscope tended to wander off-center. Enter cardboard frame and cardboard rings fitted onto the kaleidoscope tube; a circle rotating inside a square. This was better but the shrinky-dinks inside moved around fairly abruptly - they would collect in one corner and then all slide to the bottom at a certain point of critical mass with gravity. It was a bit too jarring.


The solution was to create a circular bottom (the end covered with wax paper to hold the shrinky-dinks) that included a thin circle of cardboard in the centre that kept the little pieces within the general area of the mirrors. The kaleidoscope was fixed to a grip stand arm held over the light disc, and just the circular end piece was rotated. That worked quite well. 


The results were composited in Premiere along with a layer of acrylic paint used as a circular matte


Saturday, July 6, 2013

here is the church, here is the steeple...

..and here is the little cardboard church featured in the music video. A bit of salt for shingles. 

Part of the song's inspiration came from this little building by Dovercourt - a mini-church! in the middle of a neighbourhood.

I used pencil crayons and Shrinky-Dinks (amazing stuff) for the stained-glass windows, and lit it from inside with a night-light, another miscellaneous item salvaged from the junk drawer back home. The grey matter is butyl used to hold the light in place. 

A view from the back, and the final shot:


Next up: how the kaleidoscope was made!


Tuesday, June 18, 2013

Dog Walker: Colour Keys & Set-Fabricating

After the story stage was finished (boards drawn up, leica reel timed out), it was time to move on to colour-planning and set-maken. I started with a colour palette:


Not all these colours were used in the final film - it was fairly monochromatically blue with a few intentional pops of colour - but it served a guideline for the colour choices that I made throughout the fabrication stage. 

Next up were colour keys for major scenes. I broke up colours into a few different segments: the story takes place over the course of a sunny, wintry day, and each time the video cuts back from the chorus kaleidoscope segment it's to a slightly later hour and period of light. Breaking up the colours this way was also helpful when it came to lighting scenes - I knew roughly what I was aiming for concerning segments of scenes, and how gradual or stark to make those lighting differences. In some cases I pushed it more during the actual shoot - the yellow sky backdrop comes in earlier than initially laid out in the colour keys, and the final scenes are lit darker than in their depiction here. 

Some early set-up tests - playing with the rig, figuring out sizes for hills and vales and fences in comparison to the puppet's scale, and how much room I had for panning abilities, with keeping the size and edges of the sky (a handy bed-sheet) in consideration. 


Set-pieces, gettin' the beauty treatment. Salt!

Cardboard tree backgrounds, referenced from the earlier maquette style exploration.

Finished set-pieces, fences, telephones, church - more on the church next time!

Friday, June 14, 2013

The Most Loyal: Dog Walker

Dog Walker - The Most Loyals from Carla Veldman on Vimeo.

Sooo this was finished two weeks ago and it had a lovely premiere at the band's album release party last night. I had a wonderful experience crafting this music video over the last few months, and The Most Loyal were amazing to work with. Special thanks: The Most Loyal, Andy Veldman, Fraser Goulding & Display Arts of Toronto, Nicole Breedyk, Aparajita Ravichandran, Lisa Wilson, Jen Quevedo, Chris Walsh, Aldines Zapparoli, and Kevin Parry.

More behind-the-scenes to come over the next few weeks!

p.s. fullscreen-it or go to vimeo to watch this in all its glorious HD beauty.

Wednesday, June 12, 2013

The Most Loyal album release party!

HEY! The music video/recent stop-mo project I've been working on will be premiering at the album release party tomorrow night in Toronto at Clinton's (693 Bloor Street West, 9pm, cover is $7). If you're in the area, come on out!

More info to be found on facebook!

Monday, June 10, 2013

Fabricating Trees!

A little behind-the-scenes on steel tree fabrication:


I made the trees from a combination of brass soldering rods (for the trunks) and steel wire for branches. The wire came painted black, but I didn't want any other coating because it would require burning/melting that off first in order to make a clean joint, which would be a nuisance. I drew designs, snipped pieces, laid everything out, taped pieces in place.


I brought these home, invested in a brazing kit from Home Hardware, and learned how to braze from my dad. I opted for brazing with these because it was sturdy and relatively quick. Gluing wouldn't have a strong enough bond and would take up drying time, and the steel was too thick for soldering. 

The brazing held up pretty well. There were two or three branches that broke in transition - sometimes the solder didn't spread between the joints too well - it would bubble up (a heating/timing issue I suspect), and these were more prone to snapping off. Other pieces were too small and close together so that when I heated one piece, the solder on surrounding pieces would melt and branches would fall off. I was pretty ambitious with the designs, so some of the tree branches required gluing - these were mostly the pine trees. 

So I made a tree! And then I made 30 more. 


After the trees were brazed, they got a coat of grey auto primer to make for a better painting surface, a paint job in acrylic, followed by a good dose of spray glue and salt. 


Thank you to Andrew Patten and Sarah Davignon of The Most Loyal for their help with salting trees!

Wednesday, June 5, 2013

Set Designs


The following are some tree designs early in the design process:
I like trees quite a bit. These proved an interesting area when it came to taking initial design to actual realization. I knew I wanted to make the trees from wire. The first thing I did was make a few mini versions (floral wire glued onto armature wire, painted and salt-coated) as well as a maquette of the proposed visuals for the set:

Maquette: wire, cardboard, paper, salt.

Sunday, May 26, 2013

A Do-It-Yourself Camera Rig

The title's a bit of a misnomer since I did not do it entirely myself, but if you know how to weld or someone who does, you're good.

The aforementioned train-track-camera-rig wasn't going to cut it for this stop-mo project, so I picked up the phone and called home. My dad is an amazing handyman and knows how to weld (bonus!), so we sat down and made a plan for a do-it-yourself camera rig, one that would be relatively portable, stable, and cost-effective, with the ability to tilt the camera at different angles as well as do horizontal panning. The plans drew up something like this:

And the final outcome was this beaut:


The base is a chair bottom from one of my mom's old sewing chairs - having a pack-rat streak in the family is very convenient. The vertical pipe is fence-rail, the horizontal one a big square length of steel pipe. My dad welded together larger square and round pipe sections for the adjusting piece that allows the camera to be moved along the dolly, as well as nuts onto each piece and steel handles onto bolts in order to lock the pipes in place. A special thank you to Mitchel Kennedy for the suggestion of using a tripod head to mount the camera on the rig - the stand that attaches to the head fits nicely into the square pipe and allows for up-down swivel. We added a nut and bolt at that end to lock it into place.


Did some tests with it, made some adjustments, and overall it worked out pretty well. The vertical pipe slides onto a piece of metal scrunched into the top of the chair base - it can wobble a bit, so I drilled a hole and stuck in a long screw, which worked for the time being. What it really needs is two screws going all the way through at different angles to hold it in place, which will be done before next use. There's some wiggle within the horizontal track, which changes depending on how far or close the camera is to the centre and the distribution of its weight, which isn't difficult to correct mid-shot. You learn its little quirks and work with them. Overall pretty awesome for a home-made project. I am extremely grateful for the help with this.


I also made an old turntable into a simple rig for a panorama-type shot, removing the rubber mat, elastic band (which was already shot I think when I got it), needle arm etc. and using measuring tape for marking increments.